Welcome to our comprehensive guide on how to make a concrete pond! Building a concrete pond in your backyard can add a touch of serenity and beauty to your outdoor space. Whether you’re looking to create a habitat for fish or simply want a water feature that enhances the ambiance of your garden, a concrete pond is a durable and customizable option. In this article, we’ll walk you through the step-by-step process of building your very own concrete pond.
Materials Needed:
Before you begin constructing your concrete pond, gather the following materials:
- Concrete mix
- Reinforcing mesh
- Shovel
- Trowel
- Pond liner
- Pond pump and filter
- Rocks and stones for decoration
- Water plants (optional)

Credit: www.motherearthnews.com
Step 1: Planning and Design
Start by determining the location and size of your concrete pond. Consider factors such as sunlight exposure, proximity to trees, and the overall aesthetic of your garden. Sketch out a design that includes the shape and depth of the pond.
Step 2: Excavation
Using a shovel, dig out the area where your pond will be located. The depth of the excavation will depend on the size of your pond and the depth you desire. Remove any rocks or debris from the area.
Step 3: Creating the Form
Once the excavation is complete, create a form for the pond using wooden boards. Ensure the form follows the shape and size of your pond design. The form will help contain the concrete mix during the construction process.
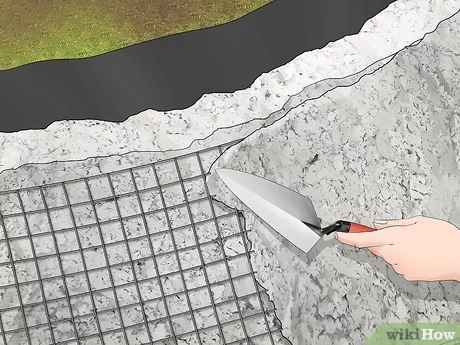
Step 4: Reinforcement
Place reinforcing mesh inside the form to provide structural support for the concrete. The mesh will help prevent cracking and ensure the longevity of your pond.
Step 5: Mixing and Pouring Concrete
Follow the manufacturer’s instructions to mix the concrete. Once the concrete mix is ready, pour it into the form, filling it to the desired depth. Use a trowel to smooth out the surface of the concrete.
Step 6: Curing
Allow the concrete to cure for the recommended period of time. This process is crucial for the concrete to achieve its maximum strength and durability. Keep the concrete moist during the curing process to prevent cracking.
Step 7: Installing the Pond Liner
Once the concrete has cured, install a pond liner inside the pond to prevent water leakage. Make sure the liner fits snugly and is free of wrinkles to ensure a watertight seal.
Step 8: Adding Water and Accessories
Fill the pond with water using a hose or bucket. Install a pond pump and filter to keep the water clean and circulating. Add rocks, stones, and water plants to enhance the aesthetic appeal of your pond.

Credit: www.youtube.com
Step 9: Maintenance
Regular maintenance is key to keeping your concrete pond in top condition. Clean the pond regularly, remove debris, and check the pump and filter for any issues. Monitor the water quality and ensure the pond ecosystem remains healthy.
Conclusion
Building a concrete pond can be a rewarding DIY project that adds value to your outdoor space. By following the steps outlined in this guide, you can create a beautiful and functional water feature that enhances the ambiance of your garden. Remember to plan carefully, pay attention to detail, and enjoy the process of creating your very own concrete pond!