Are you tired of dealing with harsh chemicals in your pool? Making the switch from chlorine to salt water can offer a more natural and gentle swimming experience. Not only is salt water easier on the skin and eyes, but it also requires less maintenance in the long run. Here’s a step-by-step guide on how to change your pool from chlorine to salt water:
Step 1: Assess Your Pool
Before making the switch, it’s essential to assess your pool’s current condition. Check the size of your pool, the existing filtration system, and the type of material used in your pool. This information will help you determine the right salt water conversion kit needed for your pool.
Step 2: Purchase a Salt Water Conversion Kit
Invest in a high-quality salt water conversion kit that includes a saltwater generator, salt cell, flow switch, and control panel. Make sure to choose a kit that is compatible with the size and type of your pool.
Step 3: Drain the Pool
Begin the conversion process by draining your pool completely. This will allow you to start with a clean slate and remove any residual chlorine and chemicals from the water.

Credit: www.discountsaltpool.com
Step 4: Install the Salt Water Generator
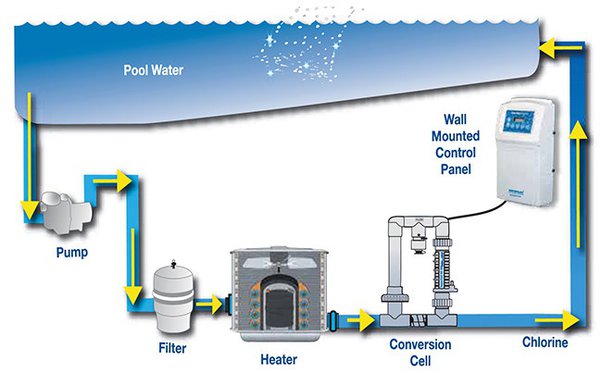
Follow the manufacturer’s instructions to install the salt water generator in your pool. This device will convert the salt into chlorine through a process called electrolysis, providing a continuous supply of clean and sanitized water.
Step 5: Add Salt to the Pool
Once the generator is installed, add the appropriate amount of salt to your pool. The ideal salt level for a salt water pool is around 3,000 ppm (parts per million). Use a saltwater test kit to monitor and adjust the salt levels as needed.
Step 6: Balance the Water Chemistry
After adding salt to the pool, it’s crucial to balance the water chemistry. Test the pH, alkalinity, and calcium hardness levels of the water and make adjustments as necessary to ensure a safe and comfortable swimming environment.
Step 7: Start the Salt Water Generator
Once the salt level and water chemistry are balanced, it’s time to start up the salt water generator. Set the desired chlorine output level on the control panel and let the generator do its job of keeping your pool water clean and clear.
Step 8: Monitor and Maintain the System
Regularly check the salt level, chlorine output, and water chemistry of your salt water pool. Clean the salt cell periodically to ensure optimal performance and longevity of the system. Additionally, keep an eye on any warning lights or alerts on the control panel.

Credit: m.youtube.com
Step 9: Enjoy Your Salt Water Pool
Once you’ve completed the conversion process and ensured that your salt water system is running smoothly, it’s time to sit back, relax, and enjoy your new salt water pool. Invite friends and family over for a swim and experience the benefits of swimming in gentle, crystal-clear water.
Benefits of Switching to Salt Water
Switching from chlorine to salt water offers numerous benefits, including:
- Gentler on skin and eyes
- Less harsh chemicals
- Lower maintenance costs in the long term
- Reduced chlorine odor
- Environmentally friendly
By following these steps and making the switch to salt water, you can transform your pool into a relaxing oasis that provides a more natural and enjoyable swimming experience for you and your loved ones.