Creating a wildlife pond is a wonderful way to attract a variety of fascinating creatures to your garden. Not only does it provide a source of water for wildlife, but it also adds an aesthetic and tranquil element to your outdoor space. Whether you have a large backyard or a small garden, building a wildlife pond is an achievable and rewarding project. In this comprehensive guide, we will take you through the step-by-step process of building a wildlife pond that will become a thriving ecosystem for various species.
Step 1: Planning and Design
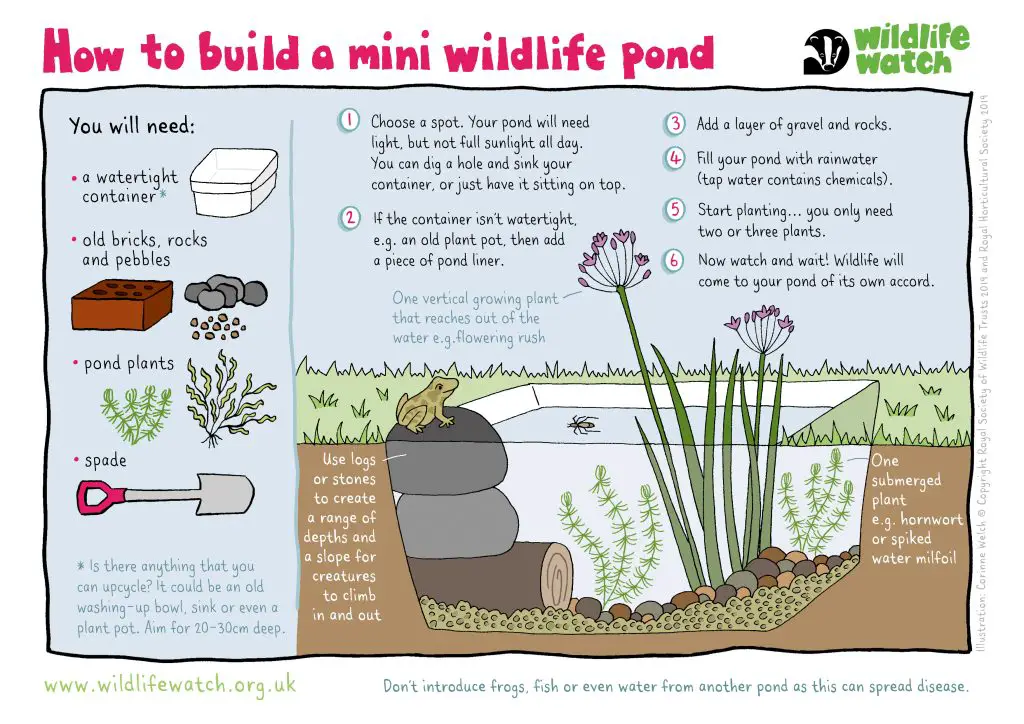
Before you start digging, it’s crucial to plan and design your wildlife pond. Consider the size, shape, and location of the pond. Aim for a variety of depths to accommodate different wildlife, with shallower areas for birds and small mammals and deeper areas for aquatic life. Additionally, decide on the type of edging you want, whether it’s natural rocks, pebbles, or a gentle slope for easy access by creatures.
Step 2: Choosing the Right Location
The location of your wildlife pond is vital for its success. Ideally, it should be situated in a spot that receives a good amount of sunlight, as this will promote the growth of aquatic plants and algae, which are essential for the pond’s ecosystem. However, it’s also important to consider some shade to prevent the water from overheating in the summer.
Step 3: Digging the Pond
Once you have planned and marked out the area for your wildlife pond, it’s time to start digging. The depth of the pond will depend on the types of wildlife you want to attract, but a variety of depths within the pond is beneficial for biodiversity. Be sure to create gently sloping sides to allow creatures easy access in and out of the water. As you dig, it’s a good idea to create shelves at different levels for marginal plants.
Step 4: Installing a Pond Liner
After the pond has been dug to the desired shape and depth, the next step is to install a pond liner. This will help to prevent water from seeping into the surrounding soil. There are various types of pond liners available, including flexible rubber liners and preformed plastic liners. Ensure that the liner is securely in place and that any excess material is trimmed away.
Step 5: Adding Substrate and Edging
Once the liner is in place, add a layer of substrate to the bottom of the pond. This can be a mixture of sand and gravel, which provides a natural substrate for aquatic plants and helps to anchor them in place. Next, create the desired edging around the pond, whether it’s using natural rocks, pebbles, or a gentle slope. This will not only enhance the visual appeal of the pond but also provide access for wildlife.

Credit: www.youtube.com
Step 6: Filling the Pond with Water
With the pond structure in place, it’s time to fill it with water. Use a hose or buckets to slowly fill the pond, allowing the water to settle and the pond liner to conform to the shape of the pond. It’s important to use dechlorinated water, as tap water containing chlorine can harm the delicate balance of the pond’s ecosystem. Let the pond fill naturally with rainwater, or treat tap water with a dechlorinating agent.
Step 7: Introducing Aquatic Plants
Aquatic plants are essential for maintaining a healthy wildlife pond. They provide oxygen, shelter, and food for various creatures. Choose a variety of plants, including submerged, floating, and marginal species. Submerged plants oxygenate the water and provide cover for aquatic life, while floating plants offer shade and shelter. Marginal plants around the edge of the pond provide habitat for insects and amphibians.
Credit: tayportgarden.org
Step 8: Establishing the Wildlife Habitat
As the pond matures, it will attract a diverse range of wildlife. From frogs and newts to dragonflies and birds, the pond will become a thriving ecosystem. To encourage wildlife to visit and inhabit the pond, consider adding logs or large stones at the edge to provide basking spots for amphibians and reptiles. Additionally, planting native wildflowers around the pond will attract pollinators and provide a food source for many species.
Step 9: Maintenance and Care
Once your wildlife pond is established, it’s important to maintain it to ensure its longevity and health. Regular maintenance tasks include removing excess vegetation, such as algae, and thinning out overgrown plants to prevent them from dominating the pond. It’s also essential to check the pond for any signs of damage to the liner and to keep the water level consistent, especially during dry periods.
Conclusion
Building a wildlife pond is a fulfilling and environmentally beneficial project that can transform your outdoor space into a thriving habitat for a variety of creatures. By following these step-by-step guidelines, you can create a pond that not only enhances the beauty of your garden but also provides a vital water source and habitat for wildlife. Embrace the sights and sounds of nature as your wildlife pond becomes a haven for biodiversity.
Remember, the key to a successful wildlife pond is patience and observation. Allow the pond to evolve naturally, and soon you’ll be rewarded with a captivating display of wildlife activity right in your own backyard.


