Creating a pond in your backyard can be a rewarding and relaxing experience. One crucial element of building a pond is fitting a pond liner correctly. A pond liner is essential for preventing water from seeping into the ground and maintaining the water level in your pond. In this guide, we will walk you through the process of fitting a pond liner step by step.
Step 1: Measure the Pond Area
The first step in fitting a pond liner is to measure the area where the pond will be located. Measure the length, width, and depth of the pond. Add an additional 2 feet to each measurement to allow for overlap and secure the liner in place.

Credit: www.youtube.com
Step 2: Choose the Right Pond Liner
When selecting a pond liner, consider the size and shape of your pond. Pond liners come in various materials such as PVC, EPDM, and butyl rubber. Choose a durable liner that is resistant to UV rays and punctures.
Step 3: Prepare the Pond Area
Before installing the pond liner, clear the area of any sharp objects, rocks, and debris that could puncture the liner. Level the ground and remove any roots or vegetation that may grow through the liner.
Step 4: Install Underlayment
Place a protective underlayment over the prepared pond area. The underlayment acts as a cushion and protects the pond liner from sharp objects and rough surfaces. Ensure the underlayment covers the entire pond area.
Step 5: Position the Pond Liner
Unroll the pond liner over the underlayment, ensuring that it covers the entire pond area with some excess around the edges. Smooth out any wrinkles or folds in the liner to prevent leaks and ensure a snug fit.
Step 6: Secure the Pond Liner
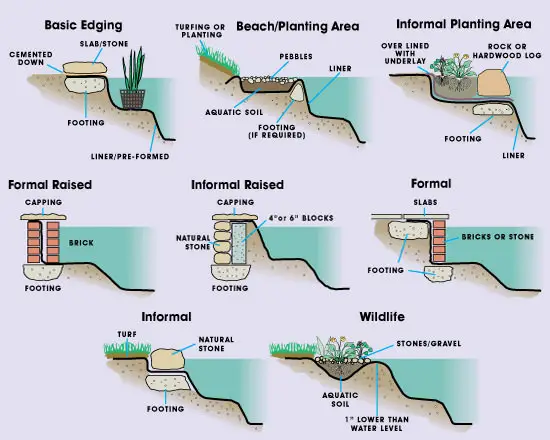
Once the pond liner is positioned correctly, secure it in place using rocks, bricks, or other heavy objects around the edges. This will prevent the liner from shifting and maintain the shape of the pond.

Credit: www.btlliners.com
Step 7: Trim Excess Liner
Trim any excess liner around the edges of the pond using a sharp utility knife. Leave a few inches of liner beyond the edge of the pond to allow for adjustments and secure the liner in place.
Step 8: Create Folds and Seams
To create a clean finish and secure the liner, make folds and seams at the corners of the pond. Fold the excess liner neatly and secure it with pond liner tape or adhesive to prevent water from seeping out.
Step 9: Fill the Pond with Water
Once the pond liner is securely in place, fill the pond with water slowly. Monitor the water level and adjust the liner if needed to prevent any leaks or wrinkles. Allow the water to settle and adjust the liner as necessary.
Step 10: Add Finishing Touches
With the pond filled with water, you can now add rocks, plants, and other decorative elements to enhance the beauty of your pond. Consider adding a fountain or waterfall feature for a tranquil and inviting atmosphere.
Final Thoughts
Fitting a pond liner is a crucial step in building a pond that will last for years to come. By following these steps and taking the time to properly fit the liner, you can create a beautiful and functional pond in your backyard. Remember to regularly inspect the pond liner for any signs of wear or damage and make repairs as needed to ensure the longevity of your pond.


