Creating a beautiful and healthy pond environment requires proper filtration to keep the water clean and clear. One way to achieve this is by building your own pond filter. Not only is it a cost-effective solution, but it also gives you the flexibility to customize the filter according to the specific needs of your pond. In this guide, we will walk you through the step-by-step process of building your own pond filter.
Credit: gardens.theownerbuildernetwork.co

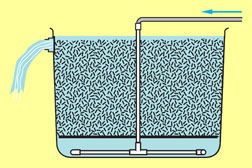
Credit: pondsguide.com
Benefits of Building Your Own Pond Filter
Before we delve into the construction process, let’s explore the benefits of building your own pond filter. First and foremost, it allows you to tailor the filter to suit the size and unique requirements of your pond. Additionally, DIY pond filters are often more affordable than pre-made options, saving you money in the long run. Building your own filter also provides a sense of satisfaction and accomplishment, as you witness the impact of your creation on the overall health of your pond ecosystem.
Materials and Tools You’ll Need
Now, let’s gather the necessary materials and tools to get started. Here’s a list of what you’ll need:
Materials:
- Large plastic container or barrel
- PVC pipes and fittings
- Pond filter media (such as filter foam, bio-balls, or lava rocks)
- Pond pump
- Silicone sealant
- Screen mesh or filter cloth
- Waterproof sealant
- Plastic hose clamps
- Waterproof adhesive
Tools:
- Drill
- Saw
- Hacksaw
- Screwdriver
- Utility knife
- Measuring tape
- Marker
Constructing Your DIY Pond Filter
Now that you have all the necessary materials and tools, it’s time to roll up your sleeves and start building your DIY pond filter. Follow these steps:
Step 1: Select The Container
Begin by choosing a large plastic container or barrel that will serve as the main body of your filter. Make sure it is sturdy and has enough capacity to accommodate the volume of water in your pond.
Step 2: Mark And Cut Openings
Using a marker, outline the locations where the PVC pipes and fittings will be installed. Then, carefully cut out these openings using a saw or utility knife, ensuring a snug fit for the pipes and fittings.
Step 3: Install Inlet And Outlet Pipes
Insert the PVC pipes and fittings into the openings you’ve created. These will serve as the inlet and outlet for water flow. Use silicone sealant to secure the connections and prevent any leaks.
Step 4: Create The Filtration Chamber
Within the container, create a separate chamber using PVC dividers or baffles. This will help guide the water flow through the filtration media, ensuring thorough filtration before the water returns to the pond.
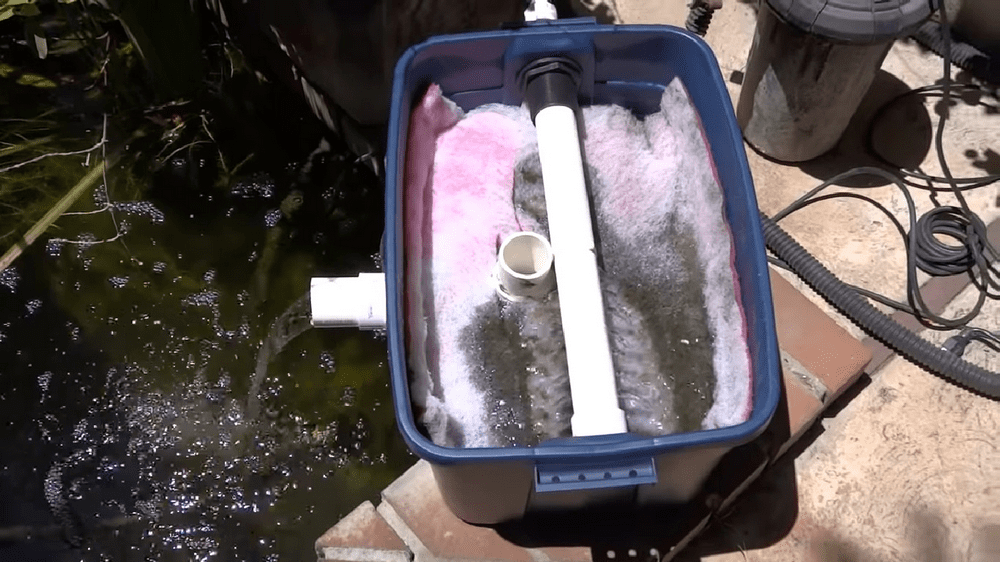
Step 5: Add Filter Media
Place the pond filter media, such as filter foam, bio-balls, or lava rocks, inside the filtration chamber. These media will trap debris and provide surface area for beneficial bacteria to thrive, promoting biological filtration.
Step 6: Install The Pump
Position the pond pump inside the container, ensuring it is submerged in the water. Connect the pump to the outlet pipe using plastic hose clamps to secure the connection.
Step 7: Create A Lid
Create a lid for the filter using a screen mesh or filter cloth to prevent debris from entering the filter and clogging the media. Secure the lid in place using waterproof adhesive to ensure it stays in position.
Step 8: Test And Adjust
Before placing the filter in your pond, perform a test run to ensure everything is functioning as intended. Make any necessary adjustments and seal any potential leaks with waterproof sealant.
Maintaining Your DIY Pond Filter
Once your DIY pond filter is up and running, it’s important to establish a regular maintenance routine to keep it functioning optimally. Here are some maintenance tips:
- Regularly clean the filter media to prevent clogging and maintain efficient filtration.
- Check and clean the pump intake to remove any debris that could obstruct water flow.
- Monitor the water flow and make adjustments as needed to achieve proper circulation and filtration.
- Inspect the filter for any signs of damage or wear, and address any issues promptly.
- Test the water quality periodically to ensure the filter is effectively maintaining a healthy pond environment.
Conclusion
Building your own pond filter is a rewarding endeavor that offers numerous benefits, from customization to cost-effectiveness. By following the step-by-step guide outlined in this article, you can create a DIY pond filter that suits the specific needs of your pond and promotes a thriving aquatic ecosystem. Remember to prioritize regular maintenance to ensure your filter continues to keep your pond water clean and clear. Embrace the satisfaction of knowing that your DIY creation is contributing to the beauty and health of your pond.
Now that you have the knowledge and guidance to build your own pond filter, it’s time to put your skills to work and enhance the quality of your pond environment. Happy filtering!