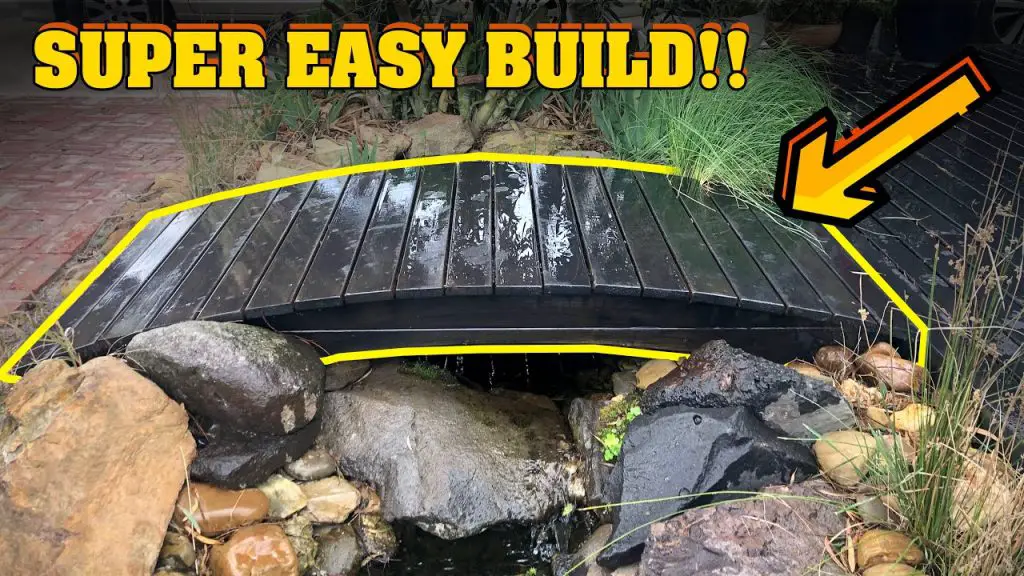
Adding a small bridge to your pond can elevate the aesthetic appeal of your outdoor space and create a charming focal point. Not only does it enhance the visual appeal, but it also provides a functional pathway across the water. Building a small pond bridge can be a rewarding DIY project that adds character and charm to your landscape. In this guide, we’ll walk you through the step-by-step process of building a small pond bridge.
Step 1: Planning and Design
The first step in building a small pond bridge is to carefully plan and design the structure. Consider the size and style of your pond, as well as the surrounding landscape. Measure the distance across the pond where you want to place the bridge and take note of any features that may affect the bridge’s design, such as rocks or plants.
Sketch out a design for your bridge, taking into account the width, length, and height. Determine the type of material you want to use for the bridge, whether it’s wood, stone, or composite materials. Consider the style of the bridge – whether it’s arched, flat, or curved – and ensure that it complements the overall look of your pond and garden.
Step 2: Gathering Materials and Tools
Once you have a clear plan and design in place, it’s time to gather the materials and tools you’ll need for the project. Depending on the design of your bridge, you may need lumber, screws, nails, concrete, gravel, and a variety of hand and power tools such as a saw, drill, and level.
When selecting materials, consider durability and weather resistance, especially if your bridge will be exposed to the elements. If you’re using wood, opt for pressure-treated lumber or rot-resistant species such as cedar or redwood. For a more modern look, composite materials like PVC or vinyl can be a low-maintenance alternative.
Step 3: Preparing the Site
Before you begin construction, it’s important to prepare the site where the bridge will be installed. Clear the area of any debris, rocks, or vegetation, and ensure that the ground is level and stable. If necessary, use a shovel to dig out any uneven or soft areas and fill them with gravel or compacted soil to create a solid foundation for the bridge.
Step 4: Building the Foundation
The foundation is a critical element of a sturdy and long-lasting bridge. Depending on the size and style of your bridge, you may need to pour concrete footings, set support posts, or create a stone base. Follow your design plan and ensure that the foundation is level and securely anchored to the ground.
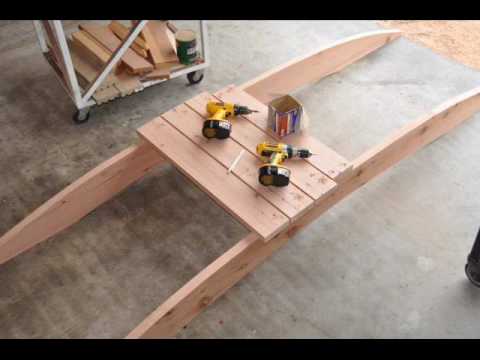
Step 5: Constructing the Bridge Structure
With the foundation in place, it’s time to build the structure of the bridge. If you’re using wood, start by assembling the frame and decking, ensuring that each component is securely fastened. Use galvanized or stainless steel hardware to prevent rust and corrosion, especially if your bridge will be in constant contact with water.
For a stone bridge, carefully stack and mortar the stones to create a stable and visually appealing structure. Take your time to ensure that each stone is securely in place and that the overall design is structurally sound. Consider the weight and placement of the stones to create a balanced and stable bridge.
Step 6: Adding Finishing Touches
Once the bridge structure is complete, add finishing touches to enhance its appearance and longevity. Apply a weatherproof sealant or stain to wooden bridges to protect them from moisture and UV damage. For stone bridges, consider using a masonry sealer to protect the stones from water and weathering.
You may also want to add railings or handrails for safety and aesthetics. Depending on your design, railings can be made from wood, metal, or composite materials. Ensure that the railings are securely attached and meet safety standards for load-bearing and height requirements.
Step 7: Installing the Bridge
With the bridge construction complete, carefully position and install it across the pond. Enlist the help of friends or family members to assist with lifting and placing the bridge in its designated location. Use a level to ensure that the bridge is evenly positioned and securely anchored to the foundation.
Once the bridge is in place, take a moment to admire your handiwork and enjoy the visual impact it adds to your pond and garden. Consider adding lighting or decorative elements to further enhance the bridge’s charm, especially if you plan to use it as a focal point for evening gatherings or outdoor events.
Step 8: Maintenance and Care
To ensure that your small pond bridge remains in top condition, it’s important to perform regular maintenance and care. Inspect the bridge for signs of wear, rot, or damage, and address any issues promptly. Clean the bridge regularly to remove debris, algae, or moss that may accumulate on the surface.
If your bridge is made of wood, consider reapplying sealant or stain every few years to protect it from the elements. For stone bridges, inspect the mortar joints and reapply mortar as needed to maintain the structural integrity of the bridge. By staying proactive with maintenance, you can prolong the lifespan and beauty of your small pond bridge for years to come.

Credit: www.instructables.com
Credit: www.youtube.com
Conclusion
Building a small pond bridge can be a rewarding and enjoyable project that adds a touch of elegance and functionality to your outdoor space. With careful planning, quality materials, and attention to detail, you can create a charming bridge that enhances the beauty of your pond and garden. Whether it’s a rustic wooden bridge or a graceful stone structure, a small pond bridge can become a captivating feature that elevates the overall appeal of your landscape.
So, roll up your sleeves, gather your tools, and embark on the journey of building a small pond bridge that will be admired and enjoyed for years to come.