Creating a manmade pond can be a rewarding and relaxing addition to your property. Whether you want to enhance the aesthetics of your garden, provide a habitat for wildlife, or simply enjoy the peaceful sounds of water, building a pond is a great project to undertake. In this comprehensive guide, we will walk you through the step-by-step process of building your own manmade pond.
Step 1: Planning
Before you start digging, it’s essential to plan out your pond carefully. Consider the size and shape of the pond, its location in your yard, and any additional features you may want to include such as waterfalls or fountains. Make sure to check with local authorities to see if you need any permits for building a pond on your property.
Step 2: Choosing a Location
Select a spot in your yard that receives a good amount of sunlight but also has some shade to prevent excessive algae growth. Avoid areas with overhanging trees to minimize the amount of debris that falls into the pond. Make sure the location is easily accessible for maintenance purposes.

Credit: www.youtube.com
Step 3: Marking the Pond Area
Use a garden hose or spray paint to outline the shape of your pond. Consider using a round, oval, or kidney-shaped design for a more natural look. Make sure the dimensions of the pond will fit well in the chosen location and complement your landscaping.
Step 4: Digging the Pond
Start digging out the pond area, making sure to create shelves or varying depths to accommodate different types of aquatic plants. Remove any rocks, roots, or debris from the soil as you dig. The depth of the pond will depend on the size of the pond and the types of fish or plants you plan to have.
Step 5: Installing a Pond Liner
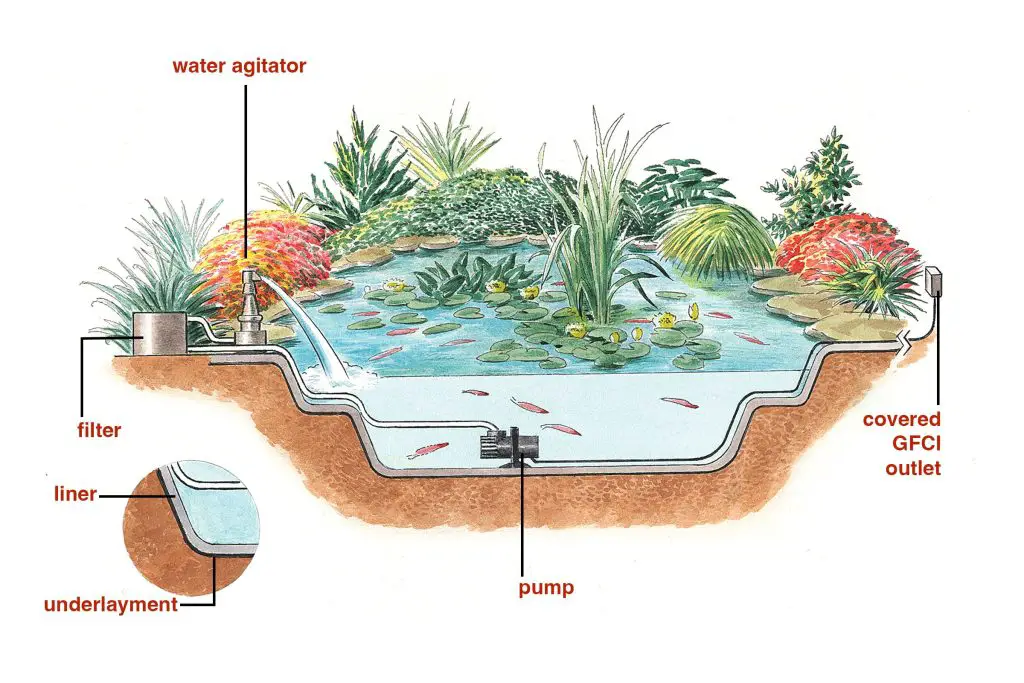
Once the hole is dug, it’s time to install a pond liner to prevent water from seeping into the soil. Choose a high-quality pond liner that is durable and flexible. Spread the liner carefully over the hole, making sure to smooth out any wrinkles or folds.
Step 6: Adding Rocks and Gravel
Enhance the aesthetics of your pond by adding rocks and gravel around the edges. This will help to secure the pond liner in place and create a more natural look. You can also use larger rocks to create a waterfall or stream feature in your pond.

Credit: rethinkrural.raydientplaces.com
Step 7: Filling the Pond with Water
Once the liner is in place and the rocks are arranged, it’s time to fill the pond with water. Use a garden hose or a water truck to slowly fill the pond, allowing the water to settle and the liner to conform to the shape of the pond. Fill the pond to the desired depth.
Step 8: Adding Plants and Fish
Introduce aquatic plants and fish to your pond to create a balanced ecosystem. Choose a variety of plants such as water lilies, cattails, and submerged plants to provide oxygen and filtration. When adding fish, make sure to acclimate them slowly to their new environment.
Step 9: Maintenance
Regular maintenance is essential to keep your pond healthy and beautiful. Remove debris, trim plants, and check the water quality regularly. Consider adding a pump and filter system to help keep the water clean and clear. Perform routine checks to ensure the pond is functioning properly.
Step 10: Enjoying Your Pond
Once your pond is complete and thriving, take the time to sit back, relax, and enjoy the tranquil beauty of your creation. Listen to the soothing sounds of water, observe the wildlife that visits your pond, and take pride in the hard work you put into building your very own manmade oasis.
Congratulations! You have successfully built your own manmade pond. Follow these steps carefully, and you will have a stunning water feature that will bring joy and serenity to your outdoor space for years to come.


