Building a raised pond with concrete blocks can be a wonderful addition to your garden or backyard. Not only does it provide a beautiful focal point, but it also creates a relaxing atmosphere with the soothing sound of water. In this guide, we will walk you through the step-by-step process of building your own raised pond using concrete blocks.

Credit: worldofwater.com
Materials Needed:
Before you begin the construction process, it’s essential to gather all the necessary materials. Here is a list of items you will need:
| Materials | Tools |
|---|---|
| Concrete blocks | Shovel |
| Pond liner | Level |
| Gravel | Tape measure |
| Pump and filter system | Rubber mallet |
| Water plants | Water hose |
| Decorative stones | Broom |

Credit: www.youtube.com
Step-by-Step Guide:
1. Choose The Location:
Decide where you want to place your raised pond. Make sure the area is level and receives adequate sunlight for water plants to thrive.
2. Mark The Dimensions:
Use a tape measure to mark the dimensions of your pond on the ground. This will help you visualize the size and shape of the pond.
3. Excavate The Area:
Start digging within the marked dimensions to create a hole for your pond. The depth will depend on the size of the pond and the height of the concrete blocks.
4. Level The Ground:
Use a level to ensure the bottom of the hole is flat and even. This step is crucial for the stability of the pond structure.
5. Lay The First Layer Of Blocks:
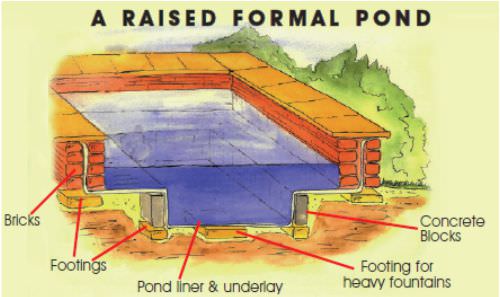
Begin placing the concrete blocks along the perimeter of the hole to form the first layer. Make sure the blocks are tightly packed together.
6. Install The Pond Liner:
Place the pond liner inside the hole, making sure it covers the entire area and overlaps the edges of the concrete blocks. Trim off any excess liner.
7. Add Gravel:
Add a layer of gravel at the bottom of the pond to provide support for the liner and create a stable base for the water plants and decorations.
8. Stack The Blocks:
Continue stacking the concrete blocks on top of the first layer, ensuring they are level and secure. This will create the walls of your raised pond.
9. Connect The Pump And Filter System:
Install the pump and filter system according to the manufacturer’s instructions. This will help keep the water clean and circulating properly.
10. Fill The Pond With Water:
Once the pond is fully assembled, fill it with water using a water hose. Check for any leaks and adjust the liner if necessary.
11. Add Water Plants:
Introduce water plants to your pond, such as lilies, lotus, or water hyacinths. These plants not only enhance the beauty of the pond but also provide oxygen for fish.
12. Decorate The Pond:
Add decorative stones, pebbles, or other ornaments around the pond to personalize its appearance and create a more natural look.
13. Maintain The Pond:
Regularly check the water quality, clean the pump and filter, and remove any debris or dead plants to ensure your raised pond remains healthy and beautiful.
Benefits of a Raised Pond:
- Enhances the aesthetic appeal of your garden
- Creates a relaxing atmosphere with the sound of water
- Provides a habitat for fish and water plants
- Requires minimal space compared to in-ground ponds
- Easy to customize and decorate
Building a raised pond with concrete blocks is a rewarding DIY project that can transform your outdoor space into a tranquil oasis. Follow these steps, unleash your creativity, and enjoy the beauty and serenity of your own homemade pond.


