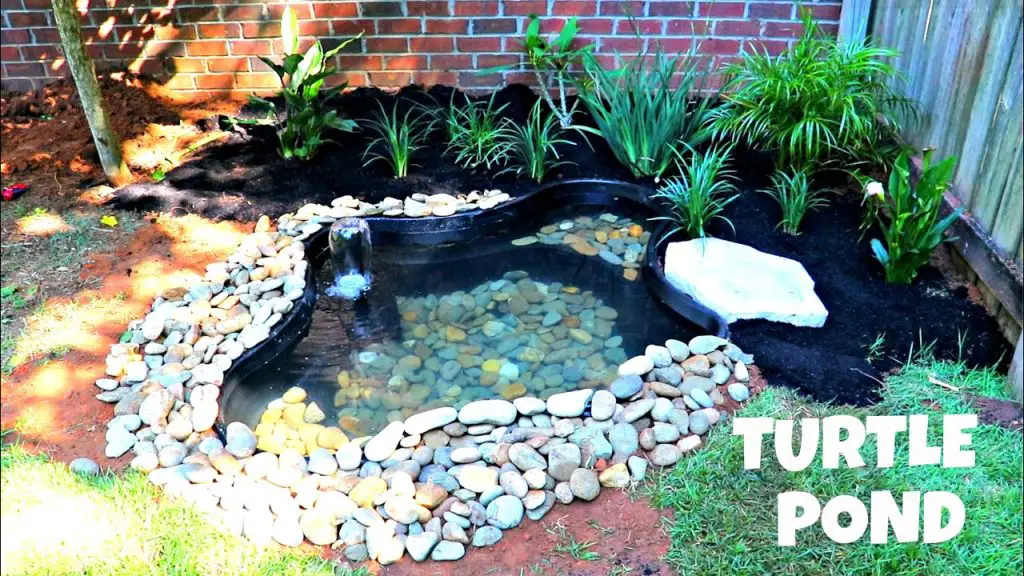
Building a small turtle pond can be a rewarding and enjoyable project for any reptile enthusiast. Not only does it provide a natural habitat for your pet turtles, but it also adds a beautiful and serene element to your outdoor space. In this comprehensive guide, we will walk you through the step-by-step process of creating a small turtle pond, from planning and design to construction and maintenance.
Step 1: Planning and Design
Before you begin digging or purchasing materials, it’s crucial to carefully plan and design your turtle pond. Consider the size of your outdoor space, the number of turtles you have or plan to have, and the overall aesthetic you want to achieve. Research different pond designs and take into account factors such as sunlight exposure, drainage, and landscaping.
Make sure to check local regulations and obtain any necessary permits for building a pond. Additionally, consider the safety and security of the pond to prevent turtles from escaping and to protect them from potential predators.
Step 2: Choosing a Location
Once you have a clear plan in place, it’s time to select the location for your turtle pond. Look for a spot in your yard that receives a good balance of sunlight and shade, as this will help promote the growth of aquatic plants and maintain a healthy ecosystem within the pond. Avoid areas with overhanging trees that could drop leaves and debris into the water.
It’s also important to ensure that the location you choose allows for easy access to electricity and water sources, as you will need to power any filtration or heating systems for the pond.
Step 3: Digging the Pond
With the design and location determined, it’s time to start digging the pond. Use marking paint or a hose to outline the shape of the pond on the ground. Start by digging the deepest part of the pond first, gradually sloping the sides to create a shallow end. This will allow your turtles to easily enter and exit the water.
Consider the dimensions carefully, ensuring that the pond is large enough to accommodate your turtles comfortably. A general rule of thumb is to provide at least 10 gallons of water per inch of shell length for each turtle.
Step 4: Installing a Filtration System
Proper filtration is essential for maintaining a healthy and clean environment for your turtles. Depending on the size of your pond and the number of turtles, you may need to install a biological and mechanical filtration system. Research different types of pond filters and choose one that suits the specific needs of your turtle pond.
Additionally, consider adding a pump to help circulate the water and prevent stagnation. This will also contribute to the overall health of the pond ecosystem.

Credit: www.reddit.com
Step 5: Adding Substrate and Plants
Once the pond is dug and the filtration system is in place, it’s time to add substrate and plants. Choose a natural substrate such as gravel or sand to line the bottom of the pond. This will provide a natural habitat for beneficial bacteria and help anchor aquatic plants.
Select a variety of aquatic plants such as water lilies, duckweed, and water hyacinth to add beauty and oxygenate the water. Not only do these plants create a more natural environment for your turtles, but they also help to maintain water quality by absorbing excess nutrients and providing shelter for small aquatic creatures.
Step 6: Creating Basking Areas
Turtles require access to dry land for basking, so it’s important to incorporate basking areas into your pond design. You can use rocks, logs, or pre-made turtle docks to create platforms where your turtles can climb out of the water and soak up the sun. Ensure that the basking areas are easily accessible and provide enough space for all of your turtles to bask comfortably.
Step 7: Filling and Treating the Water
Once all the components are in place, fill the pond with dechlorinated water. Use a water conditioner to remove any chlorine or chloramine from the tap water, as these chemicals can be harmful to your turtles. Test the water to ensure that the pH and temperature are suitable for your turtles, making any necessary adjustments as needed.
Step 8: Introducing Your Turtles
After the pond has been filled and the water has been treated, it’s time to introduce your turtles to their new home. Monitor their behavior closely to ensure they are adjusting well to the new environment. Provide plenty of hiding spots and observe their interactions with the basking areas and plants to make any necessary modifications for their comfort and safety.
Step 9: Maintenance and Care
Once your turtle pond is up and running, it’s important to establish a regular maintenance routine to keep the water clean and the ecosystem healthy. This includes regularly checking and cleaning the filtration system, removing debris and excess algae, and monitoring water quality parameters such as pH, ammonia, and nitrate levels.
Regular water changes are also essential to prevent the buildup of harmful compounds and ensure a safe and comfortable environment for your turtles. Consider investing in a water testing kit to monitor water quality and make informed decisions about any necessary adjustments or treatments.

Credit: www.youtube.com
Conclusion
Building a small turtle pond is a gratifying endeavor that provides a natural and enriching habitat for your pet turtles. By carefully planning and designing the pond, choosing a suitable location, and implementing proper filtration and maintenance practices, you can create a thriving aquatic environment that will benefit both your turtles and the overall aesthetics of your outdoor space.
Remember to always prioritize the well-being of your turtles by providing a safe and comfortable habitat that meets their specific needs. With the right care and attention, your small turtle pond can become a captivating centerpiece that enhances your enjoyment of these fascinating reptiles.


